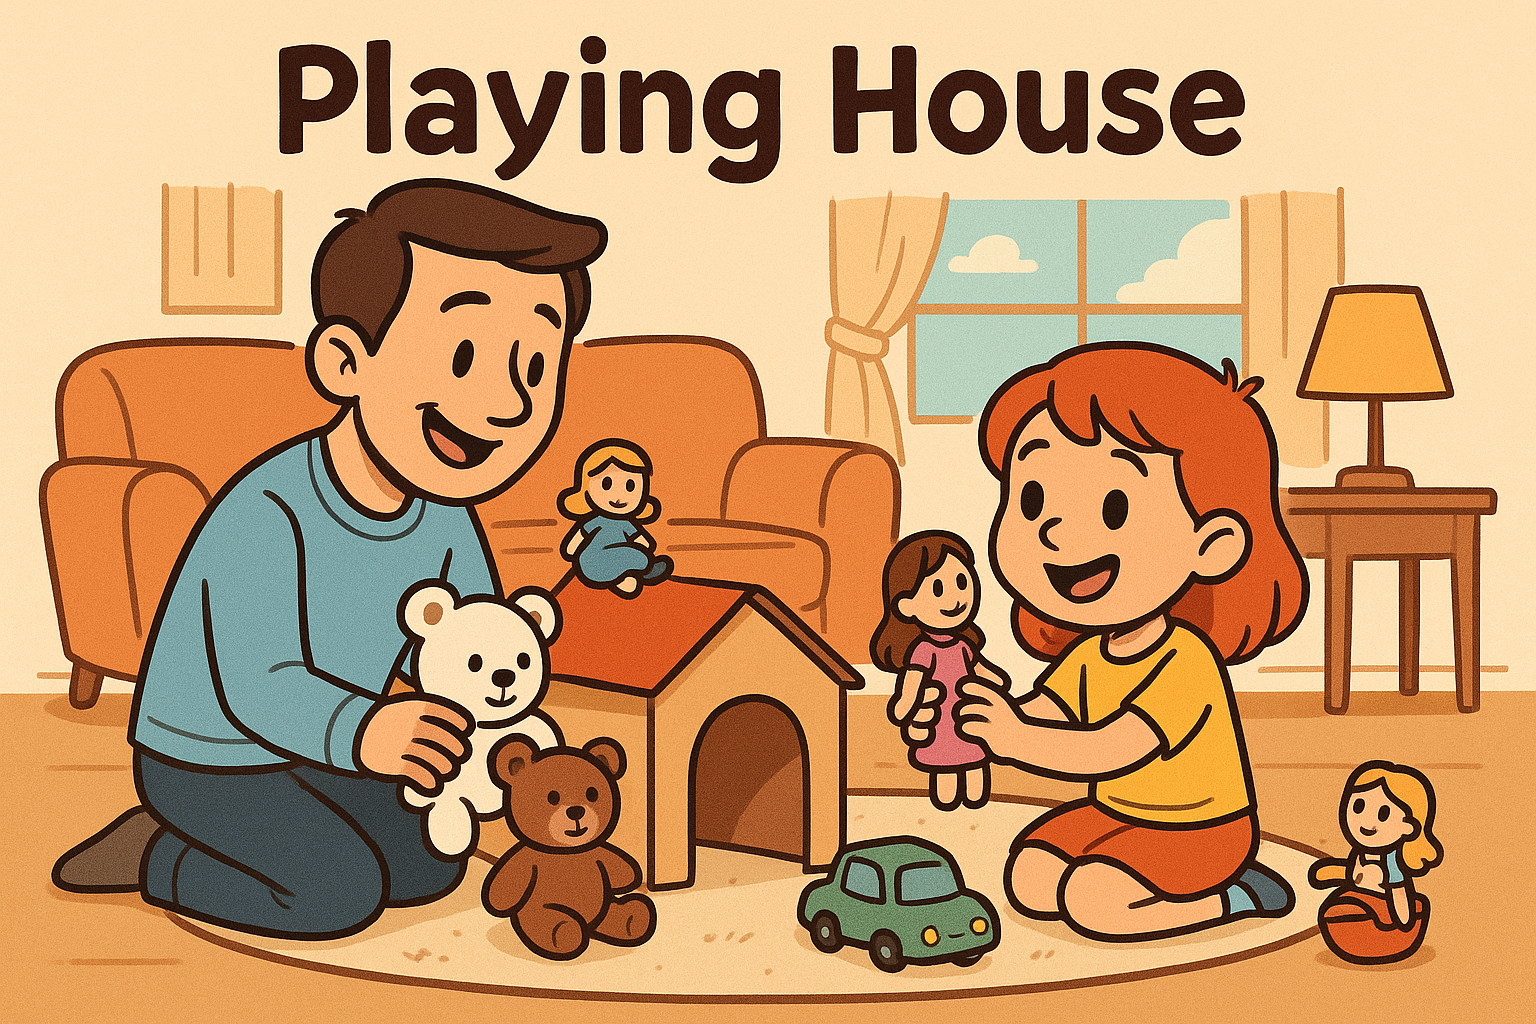
Parental Involvement: Medium

  • Blindfold Maze

    Blindfold Maze

    The Blindfold Maze is a brilliant teamwork game that encourages listening, trust, and clear communication.

    One player is blindfolded, and their partner must guide them safely through a simple maze or obstacle course using only verbal instructions.

    This activity works well with siblings, friends, or as a group game, and can be adapted to suit different spaces and skill levels. It’s perfect for a garden, living room, or even a hall—and guaranteed to get plenty of laughs along the way.


    Materials Needed

    • Blindfold (e.g. scarf or sleep mask)
    • Household items to create obstacles (cushions, chairs, toys, cones)

    Tools Needed

    • None

    Steps

    1. Set Up the Maze
      Arrange cushions, boxes, or toys to create a clear but safe path through a room or garden.
    2. Choose Roles
      One child wears the blindfold, the other is the guide. Swap after each round.
    3. Give Verbal Directions
      The guide gives instructions like “take two steps forward” or “turn left” to help their partner move through the maze.
    4. Reach the Finish
      Celebrate success and then switch roles or change the course to try again.

    Variations

    • Timed Challenge: Use a stopwatch and see who completes the maze fastest.
    • Silent Maze: Use claps or sound cues instead of words for an added twist.
    • Obstacle Upgrade: Make the maze trickier with tunnels (blankets over chairs) or balancing zones (walking along a taped line).
    • Outdoor Edition: Create a large-scale maze in the garden using garden toys, chalk, or cones.
  • Friendship Bracelets

    Friendship Bracelets

    Friendship bracelets are a timeless craft that children can make and share with friends or family. Using colourful threads, kids can practise simple patterns and braiding techniques to create wearable tokens of affection and connection.

    This activity helps improve concentration, fine motor skills, and pattern recognition. Whether made for a best friend, a sibling, or as a party activity, each bracelet becomes a small, meaningful gift from the heart.


    Materials Needed

    • Embroidery thread, yarn, or thin wool in assorted colours
    • Optional: beads or letter beads
    • Sticky tape or safety pin (to secure the bracelet while working)

    Tools Needed

    • Scissors

    Steps

    1. Cut the Threads
      Choose 3–6 colours of thread and cut them to about 60–80cm each.
    2. Tie a Knot
      Tie all the strands together in a knot at one end. Tape this end to a table or pin it to a cushion or jeans.
    3. Start Braiding or Knotting
      Use a basic braid, chevron pattern, or alternating knots to weave the bracelet. Keep the tension even.
    4. Check the Length
      Once it fits around the wrist, tie off the end in another knot.
    5. Tie and Gift
      Give it to a friend and tie it on their wrist with a smile!

    Variations

    • Beaded Bracelets: Add name or alphabet beads to personalise the gift.
    • Rainbow Pattern: Use all the colours of the rainbow and arrange in repeating order.
    • Heart Design: Try more advanced knotting techniques to create shapes like hearts or stripes.
    • Friendship Bracelet Kit: Make a DIY kit to give as a gift so others can make their own.
  • Make a Card

    Make a Card

    Making a handmade card is a thoughtful and creative activity that children can enjoy year-round.

    Whether it’s for a birthday, celebration, holiday, or just to say hello, handmade cards are a lovely way to practise writing, drawing, and design skills while brightening someone’s day.

    With just some paper, crayons, and imagination, kids can create heartfelt messages and original artwork. Add stickers, stamps, collage bits, or even a handprint to make it extra personal!


    Materials Needed

    • Cardstock, folded paper, or pre-cut blank cards
    • Crayons, pencils, markers, or paints
    • Stickers, washi tape, glitter, sequins (optional)
    • Glue or glue stick

    Tools Needed

    • Scissors
    • Ruler (optional, for neat borders or lines)

    Steps

    1. Choose Your Occasion
      Decide what the card is for—a birthday, thank you, or “just because” note.
    2. Fold the Card
      Use a blank card or fold a piece of paper in half to make the base.
    3. Decorate the Front
      Draw a picture, add stickers, create a pattern, or glue on collage elements.
    4. Add a Message
      Write a kind note or message inside. Younger children can dictate and have an adult write it.
    5. Personalise It
      Include a handprint, signature, or something the recipient will recognise.

    Variations

    • Pop-Up Card: Cut and fold a simple pop-up shape on the inside for a surprise.
    • Theme Challenge: Try cards based on animals, rainbows, or favourite stories.
    • Stamped Designs: Use stamps or cut potatoes to make your own stamp shapes.
    • Recycled Craft: Use scrap paper, wrapping paper, or old cards to decorate your new creation.
  • Build a Bug Hotel

    Build a Bug Hotel

    Building a bug hotel is a fantastic way for children to connect with the natural world while supporting local wildlife. By stacking natural materials into sheltered spaces, you can create a cosy habitat for beetles, woodlice, spiders, ladybirds, and even solitary bees.

    This project teaches kids about biodiversity, habitats, and seasonal change. It also offers plenty of opportunity for hands-on building, creativity, and observation—especially when your hotel starts to get its first tiny guests!


    Materials Needed

    • Wooden box, crate, or stack of bricks/wooden pallets
    • Dry leaves, pinecones, straw, hollow sticks or bamboo canes
    • Twigs, bark, stones, broken terracotta pots
    • Optional: chicken wire or mesh (to hold materials in place)

    Tools Needed

    • Secateurs or small saw (for trimming sticks – adult use only)
    • Gloves (optional, for handling rough materials)

    Steps

    1. Choose a Spot
      Pick a shady, quiet corner in the garden where bugs will feel safe and undisturbed.
    2. Create a Structure
      Use a wooden box, crate, or stack materials like pallets or bricks to build the hotel base.
    3. Fill with Natural Materials
      Layer twigs, leaves, pinecones, and other items inside the compartments or gaps.
    4. Add Finishing Touches
      Use mesh to keep materials in place if needed. Label your bug hotel with a sign if you like!
    5. Observe and Learn
      Keep checking back to see what insects have moved in—different bugs may visit throughout the seasons.

    Variations

    • Mini Bug Hotel: Use an old tin can filled with twigs and bamboo for a smaller version that can hang on a fence.
    • Bee Zone: Create a section just for solitary bees using bundles of hollow stems or drilled wood blocks.
    • Decorate It: Paint or label your hotel with the kids’ names or “Bug B&B” signs.
    • Bug Spotting Journal: Keep a log of the different creatures you see over time.
  • Make a Wormery

    Make a Wormery

    Building a wormery is a brilliant way for children to explore what happens beneath the soil. By creating a clear-sided container filled with layers of earth, sand, and compost, kids can observe how worms tunnel, mix soil, and break down organic matter. It’s science, nature, and wonder all rolled into one!

    This activity is perfect for introducing concepts like decomposition, recycling, and ecosystems. Kids will be fascinated watching worms at work—and it’s easy to set up using things you already have at home or in the garden.


    Materials Needed

    • Large clear jar, plastic bottle (cut and safe), or container
    • Soil, sand, and compost
    • Vegetable scraps or leaves
    • Dark paper or cloth to cover the jar
    • Worms (from your garden or compost bin)

    Tools Needed

    • Spoon or small trowel
    • Scissors (if cutting a plastic bottle)

    Steps

    1. Prepare the Container
      Use a clear container so you can see inside. If using a plastic bottle, carefully cut off the top (with adult help).
    2. Add Soil Layers
      Layer soil, compost, and a little sand to create visible layers—about halfway up the container.
    3. Add Worms
      Collect worms from the garden and gently add them on top. They’ll tunnel down themselves.
    4. Add Food
      Place a small amount of chopped veg peelings or leaves on the surface for the worms to feed on.
    5. Cover and Observe
      Wrap the container with dark paper or cloth to simulate underground conditions. Remove the cover briefly each day to observe changes.
    6. After a Week or Two
      Release the worms back into the garden or compost heap.

    Variations

    • Mini Wormery: Use a small jar for a quicker, space-saving version.
    • Observation Journal: Encourage kids to draw or write what they see happening each day.
    • Layer Experiment: Use coloured sand or different soil types to observe mixing over time.
    • Worm Names: Give each worm a name and invent little backstories for them—just for fun!
  • Plant a Mini Garden

    Plant a Mini Garden

    Planting a mini garden is a lovely way to introduce children to the world of gardening and nature. Whether it’s a windowsill herb garden, a tray of wildflowers, or a collection of potted plants, this activity encourages observation, patience, and nurturing skills.

    Children can help choose what to plant, prepare the soil, water their seedlings, and watch them grow over time. It’s great for teaching about life cycles, weather, and sustainability—plus there’s nothing more exciting than seeing the first green shoots poke through the soil!


    Materials Needed

    • Plant pots, seed trays, recycled containers, or a small wooden box

    • Compost or potting soil

    • Seeds (e.g. herbs, flowers, lettuce, beans) or small starter plants

    • Watering can or spray bottle

    • Optional: plant labels, lolly sticks, pebbles for decoration


    Tools Needed

    • Trowel or spoon

    • Watering can or spray bottle


    Steps

    1. Choose Your Container: Pick something with drainage or make holes in the bottom if needed.

    2. Add Soil: Fill with compost, leaving a little space at the top.

    3. Plant Your Seeds or Plants: Follow seed packet instructions for depth and spacing.

    4. Water Gently: Use a watering can or spray bottle to moisten the soil.

    5. Decorate and Label: Add plant markers or pebbles to personalise your garden.

    6. Watch and Care: Place in a sunny spot and water regularly. Keep an eye out for sprouts!


    Variations

    Theme Gardens: Create a herb garden, butterfly garden (using wildflowers), or pizza garden (with tomatoes, basil, and oregano).

    Recycled Planters: Use yoghurt pots, egg cartons, or tin cans as quirky containers.

    Garden Journal: Encourage kids to draw or write about their garden’s progress.

    Miniature Garden: Add fairy houses or small animal figures for imaginative play.

  • Write a Letter

    Write a Letter

    In a world of texts and instant messages, sitting down to write a letter feels wonderfully thoughtful—and it’s just as exciting to send one as it is to receive one. For children, writing letters helps develop early literacy, emotional expression, and fine motor skills in a fun, purposeful way.

    Whether they’re writing to a grandparent, a cousin, or even leaving a surprise note for a neighbour or sibling, letter-writing can be as simple or creative as they like. It’s also a lovely screen-free way to build connections and slow things down.


    Materials Needed

    • Paper or a notecard
    • Pencil, pen, or crayons
    • Envelope and stamp (if posting)
    • Optional: stickers, drawings, or small photos

    Tools Needed

    • None

    Steps

    1. Choose a Recipient
      Let your child decide who the letter is for—a friend, a relative, or even their future self.
    2. Write the Letter
      Support them in sounding out words or writing what they’d like to say. It could include what they’ve been doing, how they’re feeling, or questions they want to ask.
    3. Add Something Extra
      Encourage them to include a drawing, a joke, or even a small surprise like a pressed flower or sticker.
    4. Address and Post
      Help with the envelope and posting process—or leave the letter somewhere special if it’s staying in the house.
    5. Wait for a Reply (Optional)
      Check the postbox and talk about how it feels to send and receive something personal.

    Variations

    • Pen Pal Letters: Start a regular swap with a friend or relative to build connection over time.
    • Letters to Yourself: Write a letter to be opened in the future—a great reflective activity for older kids.
    • Kindness Notes: Write anonymous letters of kindness to leave in books, postboxes, or neighbour’s porches.
    • Holiday Themes: Send birthday, seasonal, or thank-you letters using festive colours or stickers.
  • Musical Chairs

    Musical Chairs is a fast-paced game that combines music, movement, and quick reactions.

    Players walk or dance around a circle of chairs while music plays—when it stops, everyone scrambles to sit down. There’s always one fewer chair than players, so the slowest sitter is out!

    It’s ideal for groups, burns off energy, and teaches listening skills and good sportsmanship. This game works beautifully at birthday parties, school events, or as a quick high-energy activity on a dull day. All you need is a bit of space and some chairs!


    Materials Needed

    • A music player (phone, speaker, etc.)

    • A chair for every player—minus one!


    Tools Needed

    • None


    Steps

    1. Set Up the Chairs: Arrange chairs in a circle or back-to-back in a line, with one fewer chair than the number of players.

    2. Start the Music: Begin playing music while players walk or dance around the chairs.

    3. Stop the Music: Pause the music randomly. Everyone must quickly sit down.

    4. Remove a Chair: The person left standing is out, and one more chair is removed.

    5. Repeat Until One Winner Remains: Keep playing until only one player (and one chair) is left.


    Variations

    Non-Elimination Version: Keep everyone in the game by having players complete silly challenges instead of sitting out.

    Themed Music: Use seasonal or party-themed playlists for extra fun.

    Cushion Swap: Use cushions on the floor instead of chairs for a softer version.

    Freeze Option: Combine with Musical Statues—players must freeze if they don’t get a chair!

  • Grow An Avocado Tree

    Grow An Avocado Tree

    Growing an avocado tree from a seed is a slow but satisfying project that teaches children patience, plant care, and how everyday food waste can have new life. Starting with a leftover avocado stone, kids can watch it split, sprout, and grow into a small tree over several weeks or months.

    This activity is simple to set up and works well alongside lessons about nature, sustainability, or where our food comes from. While it won’t grow fruit for many years (if at all), it makes a brilliant, hands-on introduction to growing something from scratch.


    Materials Needed

    • 1 avocado stone (pit)

    • Water

    • Clear glass or jar

    • 3–4 cocktail sticks

    • Optional: small plant pot and compost (for repotting later)


    Tools Needed

    • None (just your hands!)


    Steps

    1. Clean the Seed: After eating the avocado, rinse the stone and gently remove any remaining fruit.

    2. Insert Cocktail Sticks: Push 3–4 cocktail sticks into the middle of the seed at an angle. These will rest on the rim of the glass.

    3. Suspend in Water: Place the seed over a glass of water with the flat end down and the pointy end up. The water should cover about the bottom inch of the seed.

    4. Place in a Sunny Spot: Put the glass on a sunny windowsill. Change the water every few days to keep it fresh.

    5. Wait and Watch: In 2–6 weeks, the seed will crack open, a root will grow down, and a shoot will grow up. Once it has a strong stem and a few leaves, it can be potted in soil.

  • Cereal Box Puppet Theatre

    Cereal Box Puppet Theatre

    Cereal Box Puppet Theatre is a brilliant way to reuse packaging and spark big-time imaginative play. With a little cutting and decorating, an ordinary cereal box becomes a charming puppet stage. Add in some paper finger puppets, and your child is ready to put on a full production!

    From fairy tales and animal stories to silly made-up plots, this activity helps children explore storytelling, character creation, and performance. It’s an engaging mix of craft and pretend play—ideal for kids who love drama, drawing, or just being centre stage.


    Materials Needed

    • Empty cereal box

    • Construction paper or coloured card

    • Scrap paper or white paper (for making puppets)

    • Glue and/or tape

    • Markers, crayons, or paints

    • Optional: stickers, fabric scraps, buttons


    Tools Needed

    • Scissors or craft knife (adult supervision required)

    • Pencil

    • Ruler (optional, for neat window edges)


    Steps

    1. Cut the Stage: Stand the cereal box upright. Cut a large rectangle out of one broad side to create the “stage” window.

    2. Decorate the Theatre: Cover the outside of the box with coloured paper or paint. Add curtains, stage lights, or signage!

    3. Make Puppets: Draw characters on paper, cut them out, and tape them to fingers or use loops of paper to slip them on.

    4. Rehearse and Perform: Create a simple story, assign characters, and put on a mini show!

    5. Store Inside: Use the cereal box to store your puppets when the show’s over.


    Variations

    Stick Puppets: Tape your characters to craft sticks or straws instead of using fingers.

    Themed Theatre: Design the stage and puppets around a favourite book, holiday, or fairy tale.

    Shadow Puppet Theatre: Cut out puppets from black card and use a torch behind the box to cast shadows.

    Double-Sided Stage: Cut windows in both sides of the box so the audience can watch from either direction.

  • Secret Reveal Watercolour Painting

    Secret Reveal Watercolour Painting

    Secret Reveal Watercolour Painting is a delightful art activity that adds a little mystery and magic to painting. Children draw pictures or write secret messages using a white wax crayon on white paper. When they paint over it with watercolours, their hidden design is revealed like magic!

    This activity is brilliant for experimenting with patterns, letters, or surprise drawings, and it also introduces kids to the idea of resist painting in a way that feels like a game. It’s creative, calming, and a little bit spellbinding—perfect for indoor craft time.


    Materials Needed

    • White paper (watercolour or thicker paper works best)

    • White wax crayon

    • Watercolour paints

    • Small cup of water

    • Optional: masking tape to frame the artwork


    Tools Needed

    • Paintbrush

    • Paint palette or tray

    • Cloth for dabbing excess water


    Steps

    1. Draw a Design: Use a white crayon to draw shapes, doodles, words, or patterns on the paper. Press firmly for best results.

    2. Prepare the Paint: Wet your brush and pick a few colours to begin painting with.

    3. Paint the Page: Brush watercolours over the paper to reveal the secret design underneath—the wax crayon resists the paint!

    4. Let It Dry: Set the artwork aside to dry fully.

    5. Display or Gift: Frame it with tape edges or turn it into a greeting card.


    Variations

    Message Art: Write a secret message and let someone reveal it with their paint set.

    Seasonal Themes: Try snowflakes in winter, fireworks for Bonfire Night, or hidden Easter eggs.

    Rainbow Reveal: Use a full range of colours for a magical, multi-coloured effect.

    Black Crayon Resist: Try using black paper and white or coloured crayons for a reverse look.

  • Foil Art Embossing

    Foil Art Embossing

    Foil Art Embossing is a striking and satisfying craft that uses simple materials to create high-impact results. By drawing raised designs with glue on cardboard and covering them with aluminum foil, kids can produce shiny, embossed-style art they can color with permanent markers.

    This tactile activity encourages creativity, fine motor skills, and color exploration. Plus, the shiny foil base makes even simple designs feel magical. It’s perfect for making decorative panels, signs, or abstract patterns—and feels just a little bit like metalworking for kids!


    Materials Needed

    • Thin cardboard (from cereal boxes, etc.)

    • Aluminum foil

    • White glue

    • Sharpies or other permanent markers

    • Optional: string or ribbon to hang finished art


    Tools Needed

    • Scissors

    • Paintbrush (optional, for spreading glue)


    Steps

    1. Draw with Glue: On your cardboard, use glue to draw a simple design (lines, swirls, shapes, names). Let it dry completely—this will create the raised effect.

    2. Cover with Foil: Once dry, carefully wrap the cardboard in aluminum foil and gently press it down so the design shows through. Smooth it out with fingers or a soft cloth.

    3. Color It In: Use Sharpies to color over the foil, adding vibrant details and depth to your embossed lines.

    4. Display: Let the artwork dry fully and hang or display proudly.


    Variations

    Use Yarn or String: Instead of glue, create raised designs with glued-on yarn or string before covering with foil.

    Scratch Designs: Skip the glue and gently draw into the foil with a blunt pencil or craft stick to create etch-like line work.

    Foil Frames: Use extra foil art as borders or frames for photos or other artwork.

    Geometric Patterns: Try using rulers and repeated shapes for a modern, abstract look.

  • Egg Carton Flowers

    Egg Carton Flowers

    Egg Carton Flowers are a charming and eco-friendly craft that turns everyday packaging into a vibrant bouquet. By cutting and painting the individual cups from an egg carton, kids can design unique blossoms and attach them to pipe cleaners for stems.

    This activity encourages creativity, color exploration, and fine motor skills—all while teaching the value of reusing materials. These paper blooms make lovely decorations, gifts, or even table centerpieces that never wilt.


    Materials Needed

    • Cardboard egg cartons

    • Acrylic or poster paint

    • Pipe cleaners (for stems)

    • Optional: buttons, pom-poms, glitter, or beads for flower centers


    Tools Needed

    • Scissors

    • Paintbrushes

    • Glue or hot glue (with adult supervision)


    Steps

    1. Cut the Carton: Separate the individual cups from the egg carton. Trim edges into petal shapes if desired.

    2. Paint the Flowers: Let kids paint each cup in bright, floral colors. Add glitter or decorate the center if you like.

    3. Attach Stems: Poke a small hole in the bottom of each cup and insert a pipe cleaner. Twist it to secure or glue it in place.

    4. Let Them Dry: Allow paint and glue to dry completely before displaying.

    5. Create a Bouquet: Arrange finished flowers in a cup, vase, or wrap them with ribbon.


    Variations

    Different Flowers: Cut petals in different shapes to make tulips, daisies, or fantasy blooms.

    Add Leaves: Use green construction paper or twist extra pipe cleaner to create leaves.

    Wall Art: Glue flowers to a canvas or cardboard to make a 3D floral artwork.

    Seasonal Themes: Use pastel colors for spring, warm tones for autumn, or red and white for Valentine’s Day flowers.

  • DIY Paper Beads

    DIY Paper Beads is a fun, eco-conscious craft that turns scrap paper into wearable art. By cutting and rolling strips of old magazines, kids can create vibrant beads in all shapes and sizes. Once sealed and strung together, the result is a unique bracelet, necklace, or even keychain charm.

    This activity encourages fine motor skills, color experimentation, and upcycling—all while giving kids a chance to make something personal they can wear or gift. It’s simple, satisfying, and perfect for both quiet afternoons and party craft tables.


    Materials Needed

    • Old magazines, newspapers, or colorful paper

    • Glue stick or white glue

    • String, thread, or elastic cord for jewelry

    • Optional: clear nail polish or Mod Podge (to seal beads)


    Tools Needed

    • Scissors

    • Toothpick, skewer, or thin straw (for rolling paper strips)


    Steps

    1. Cut Paper Strips: Cut magazine pages into long triangles (about 1 inch wide at the base, tapering to a point).

    2. Roll the Beads: Starting with the wide end, roll the strip tightly around a toothpick or skewer.

    3. Glue the Tip: When you get to the end, glue down the tip to hold the bead in place.

    4. Seal the Beads (optional): Apply clear nail polish or Mod Podge to make the beads glossy and durable.

    5. String the Beads: Once dry, slide beads off the skewer and thread them onto cord to make jewelry.


    Variations

    Themed Colors: Choose specific color palettes (e.g., ocean blues, sunset tones, holiday themes).

    Shape It Up: Try different bead shapes by adjusting the strip width or cutting rectangles instead of triangles.

    Add Sparkle: Mix in metallic paper or glitter glue for extra shine.

    Make a Gift Set: Create a matching bracelet and necklace set, or package them as gifts with handmade tags.

  • Tissue Paper Stained Glass

    Tissue Paper Stained Glass

    Tissue Paper Stained Glass is a beautiful and easy craft for kids that mimics the colorful magic of stained glass. Using torn tissue paper and a sheet of wax paper or clear contact film, kids can create vibrant designs that come to life when held up to the light.

    Perfect for seasonal decorations, nature themes, or just abstract creativity, this craft supports color recognition, fine motor skills, and layering techniques—all in a mess-friendly, screen-free activity.


    Materials Needed

    • Colored tissue paper (cut or torn into pieces)

    • Wax paper or clear contact paper

    • White glue (diluted slightly with water) or glue stick

    • Optional: black construction paper for frames or outlines


    Tools Needed

    • Paintbrush (if using liquid glue)

    • Scissors


    Steps

    1. Prep the Tissue Paper: Tear or cut colored tissue paper into small pieces.

    2. Set the Base: Lay a sheet of wax paper on a flat surface (or use sticky-side-up contact paper).

    3. Apply Glue: If using wax paper, brush a thin layer of diluted glue onto it.

    4. Stick and Layer: Press tissue paper pieces onto the glue to create your design, overlapping colors if you like.

    5. Seal and Dry: Add another light coat of glue on top to seal the design. Let dry fully before displaying.

    6. Display: Tape it to a sunny window to let the light shine through!


    Variations

    Shaped Frames: Cut a heart, star, or seasonal shape from black paper and fill the center with tissue paper collage.

    Themed Designs: Try rainbows, flowers, or animals using template outlines.

    Layered Art: Create multi-layer pieces by overlapping wax paper sheets.

    Group Project: Combine many individual “panes” to make a giant stained-glass mural.

  • Recycled Robots

    Recycled Robots

    Recycled Robots is a fantastic craft project that encourages creativity and sustainability. Kids use household recyclables—like cardboard, bottle caps, toilet rolls, and foil—to build their own unique robot characters. It’s a great way to spark imagination while reinforcing the idea that art supplies don’t have to come from a shop.

    Children can design their robot’s look, name, and even invent their function or backstory. Whether it’s a space explorer or a kitchen helper, every robot is a one-of-a-kind masterpiece!


    Materials Needed

    • Small cardboard boxes (e.g. cereal boxes, tissue boxes)

    • Toilet paper rolls or paper towel tubes

    • Bottle caps, buttons, tin foil, lids, old CDs, scraps of cardboard

    • Glue, tape, and/or a glue gun (with adult help)

    • Paint, markers, or stickers for decorating


    Tools Needed

    • Scissors

    • Glue stick or craft glue

    • Optional: low-heat glue gun (for older kids with adult help)


    Steps

    1. Gather Supplies: Collect a variety of clean recyclables—different shapes and sizes make the best robots!

    2. Plan the Robot: Let kids choose a body shape and decide where to attach arms, legs, head, and features.

    3. Build the Robot: Use glue or tape to attach parts together. Boxes for bodies, toilet rolls for limbs, and bottle caps for eyes or buttons.

    4. Decorate: Add color, personality, and flair using paint, markers, stickers, or foil.

    5. Introduce Your Robot: Give it a name and invent its purpose—maybe it’s a dancing robot or a bedtime story bot!


    Variations

    Robot Pet: Make animal-inspired robots like robo-dogs or robo-cats.

    Movable Parts: Use paper fasteners to create moving arms or legs.

    Themed Robots: Build a robot with a job—chef, explorer, artist, etc.

    Group Build: Combine pieces from multiple kids to make one giant team robot!

  • Nature Collage

    Nature Collage

    Nature Collage is a lovely, hands-on activity that blends outdoor adventure with artistic creativity. As you walk through the garden, park, or woods, encourage your child to collect interesting natural treasures—leaves, flowers, twigs, seeds, and bark. Then, use these found materials to craft imaginative scenes or abstract designs back at home.

    It’s a great way for kids to slow down and observe nature, while developing fine motor skills and artistic confidence. Whether they create a leafy forest, a flower-filled landscape, or a creature made entirely from twigs, the possibilities are endless!


    Materials Needed

    • Leaves, flowers, twigs, seeds, etc. (collected during a nature walk)

    • Paper or cardboard for the base

    • White glue or glue stick


    Tools Needed

    • Optional: child-safe scissors

    • Optional: magnifying glass (for examining textures)


    Steps

    1. Go on a Nature Walk: Collect a variety of natural materials—look for different colors, shapes, and textures.

    2. Sort and Arrange: Lay everything out and let your child explore different ways to arrange the pieces on paper.

    3. Glue It Down: Once happy with the design, glue each piece down carefully.

    4. Let It Dry: Allow time for the collage to fully dry before displaying or moving it.


    Variations

    Themed Collage: Create scenes like “A Day in the Forest” or “My Garden.”

    Add Drawing: Mix natural items with drawn or painted elements for a mixed-media look.

    3D Effect: Use thicker twigs and bark to create depth and structure.

    Collage Frames: Cut a window out of cardboard to make a nature collage “frame.”

  • Puffy Paint

    Puffy Paint

    DIY Puffy Paint is a fun and tactile craft activity that turns ordinary art time into something extra exciting. Using just shaving cream, white glue, and food coloring, kids can whip up their own puffy paint and use it to create colorful, textured pictures that dry into soft, raised art.

    Perfect for preschoolers and primary-aged kids, this activity supports sensory exploration, creativity, and fine motor development. It’s great for themed projects (like clouds, ice cream, animals) or just free-painting for fun!


    Materials Needed

    • Shaving cream (foam, not gel)

    • White school glue

    • Food coloring

    • Bowls or cups for mixing

    • Spoons or craft sticks for stirring

    • Cardboard or thick paper


    Tools Needed

    • Paintbrushes or cotton swabs

    • Optional: squeeze bottles for easier application


    Steps

    1. Mix the Paint: In a bowl, combine equal parts shaving cream and white glue. Add a few drops of food coloring and stir gently until fluffy and fully colored.

    2. Prep Your Canvas: Lay out cardboard or thick paper as the painting surface.

    3. Start Painting: Use brushes, cotton swabs, or fingers to paint designs. The mixture will hold its shape for 3D texture.

    4. Let It Dry: Set the artwork aside to dry completely—this may take several hours but leaves a soft, puffy finish.


    Variations

    Squeeze It: Put the paint into squeeze bottles for more controlled, fun designs (great for outlining shapes).

    Add Glitter: Mix glitter into the paint for a sparkly twist.

    Scented Puffy Paint: Add a drop of vanilla or peppermint extract for sensory fun.

    Theme Ideas: Try making snowmen, clouds, ice cream cones, or monsters using the puffy texture.

  • Paper Plate Animals

    Paper Plate Animals


    Paper Plate Animals is a fantastic craft for young kids to explore animals, colors, shapes, and creativity—all while developing fine motor skills. With just a few basic craft supplies, children can make lions, pigs, elephants, frogs, or even made-up creatures!

    This activity is especially great for preschoolers learning about animals and their features (ears, noses, whiskers, etc.). It’s also easy to adapt for different themes, story tie-ins, or seasonal fun. Whether you’re crafting a jungle full of paper animals or just one favorite pet, it’s a mess-friendly and engaging project.


    Materials Needed

    • Paper plates

    • Paint or markers

    • Googly eyes

    • Construction paper (for ears, noses, tongues, etc.)

    • Glue

    • Scissors (adult supervision if needed)


    Tools Needed

    • Paintbrushes (if using paint)

    • Child-safe scissors

    • Glue stick or white glue


    Steps

    1. Pick an Animal: Choose which animal to make (e.g., cat, frog, pig).

    2. Paint the Plate: Use paint or markers to color the paper plate the base color of your animal.

    3. Cut and Attach Features: Cut out ears, whiskers, noses, or horns from construction paper and glue them on.

    4. Add Googly Eyes: Stick on googly eyes to bring your animal to life.

    5. Let It Dry: Set aside to dry fully, then show off your paper plate pet!


    Variations

    Mask Version: Cut eye holes and attach a stick or string to turn it into a wearable animal mask.

    3D Add-ons: Use cotton balls (for sheep), yarn (for manes), or pipe cleaners (for whiskers).

    Story Time Tie-In: Make animals from a favorite book and act it out afterward.

    Group Display: Make a zoo wall or animal parade by hanging everyone’s creations together.

    Fantasy Animals: Create dragons, unicorns, or imaginary creatures with extra sparkle and flair.

  • Make a Cardboard Box Town

    Make a Cardboard Box Town

    Big or small, cardboard boxes are the perfect building blocks for an imaginative town.

    Children can create houses, schools, post offices, and any building they dream up using tape, scissors, and craft supplies. It’s a brilliant way to reuse materials and create a whole world of pretend play.

    From cutting out windows to drawing signs and placing toy people or cars, this open-ended activity encourages creativity, storytelling, and hands-on building fun.


    Materials

    • Cardboard boxes (various sizes)
    • Coloured paper or card
    • Glue or sticky tape
    • Crayons, markers or paints
    • Optional: stickers, buttons, fabric scraps, scissors

    Tools

    • Scissors (adult supervision needed)
    • Glue stick or PVA glue
    • Sticky tape

    Steps

    1. Gather a variety of cardboard boxes — cereal boxes, delivery boxes, or tissue boxes all work well.
    2. Decide what buildings you want in your town (houses, shops, fire station, etc.).
    3. Use scissors to cut windows or doors, and decorate the outside with coloured paper or drawings.
    4. Add signs, roofs, or extra features like chimneys or awnings.
    5. Arrange the buildings into a street or town layout, and bring in toys or create paper people to live in it.

    Variations

    • Theme Your Town: Create a medieval village, futuristic space colony, or animal town.
    • Night Town: Add battery-powered tea lights inside buildings and turn the lights off for a magical effect.
    • Transport Add-ons: Make roads, train tracks or parking areas from paper or masking tape.

    Why It’s Great

    • Reuses Everyday Materials – A creative way to turn recycling into fun.
    • Encourages Engineering Skills – Children plan, construct and refine their designs.
    • Promotes Collaborative Play – Perfect for siblings or friends to build together.

    Safety Tips

    • Use child-safe scissors and supervise any cutting.
    • Make sure boxes are clean and free of sharp staples or packing tape edges.