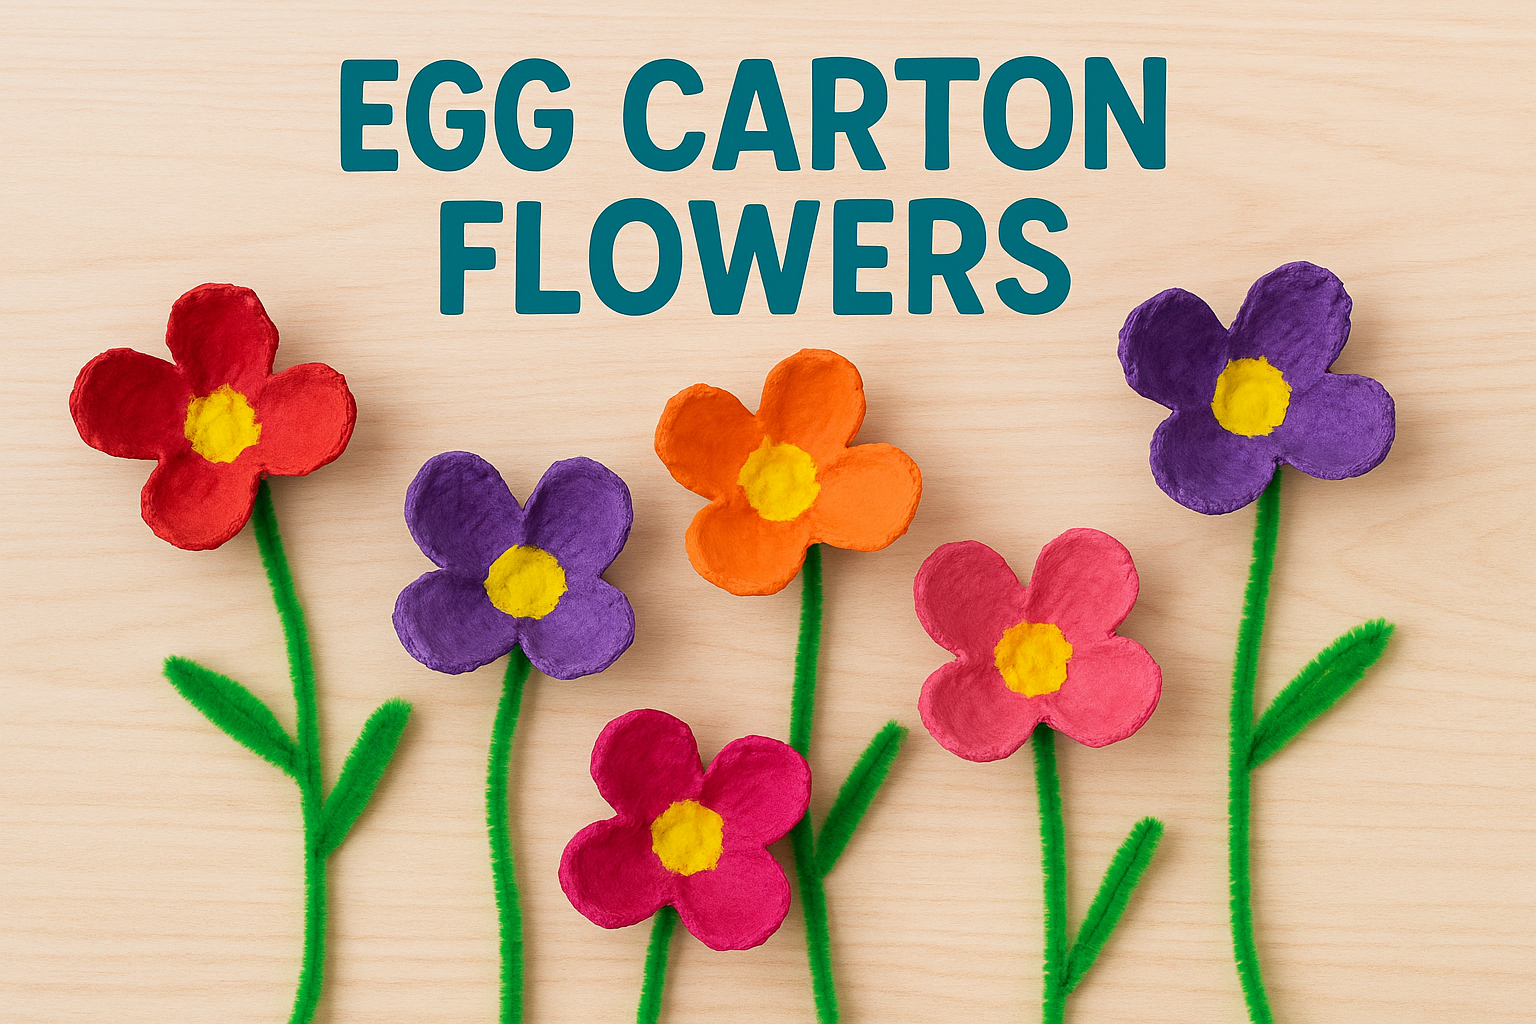
Parental Involvement: Medium

  • Beach Cricket

    Beach Cricket

    Beach Cricket is a brilliant twist on traditional cricket that’s easy to set up and perfect for beach play. Instead of wickets, you simply draw a large circle in the sand. Players take turns batting while others field. If the ball is hit outside the circle without bouncing inside first, the batter is out. If the ball bounces inside the circle before rolling out, the batter scores a point. Getting caught by a fielder also means you’re out!

    It’s a fantastic way to practice hand-eye coordination, teamwork, and strategy while keeping the rules simple enough for all ages. Plus, playing on soft sand makes everything just a little sillier—and a lot safer!


    Materials Needed

    • Lightweight cricket bat or paddle bat

    • Soft ball (e.g., tennis ball or foam ball)

    • Stumps and bails (optional)


    Tools Needed

    • None (just a stick, foot, or hand to draw in the sand)


    Steps

    1. Draw the Circle: Create a large circle in the sand with a stick or by dragging your foot.

    2. Explain the Rules:

    • If the ball is hit outside the circle without bouncing inside, the batter is out.

    • If the ball bounces inside the circle first, the batter scores.

    • If a fielder catches the ball before it hits the ground, the batter is out.

    • If you’re paying with stumps, the batter is out if the stumps are hit with the ball or bat.

    3. Take Turns: One batter at a time, everyone else fields. Rotate after getting out.

    4. Keep Score (optional): Award points for successful bounces and see who scores the most before getting out!

  • Beach scavenger hunt

    Beach scavenger hunt

    A Beach Scavenger Hunt is a brilliant way to add a little adventure to your seaside day. Give kids a list of natural items, sights, or sounds to find, and let them explore the beach with fresh eyes and endless curiosity.

    Not only does it keep kids active and engaged, but it also teaches them to observe details in nature, appreciate their surroundings, and even learn a little about marine life. You can keep it simple with a quick list or make it competitive with timed challenges!


    Materials Needed

    • Printed or handwritten scavenger hunt list

    • Pencil, pen, or crayon

    • Optional: small bag or bucket for collecting items (where appropriate)


    Tools Needed

    • None


    Steps

    1. Prepare a List: Make a list of beachy things to find (e.g., a white shell, smooth pebble, feather, crab footprints, seaweed).

    2. Set the Rules: Decide if kids need to collect items, take photos, or simply point them out.

    3. Start Hunting: Let kids explore and check off as many items as they can find.

    4. Optional Challenge: Add a timer for an exciting race or offer a small prize for completing the list!

  • Build a sandcastle

    Build a sandcastle

    Few things capture the magic of a beach day quite like building a sandcastle. This timeless activity encourages creativity, teamwork, and fine motor skills as kids dig, mold, and decorate their sandy creations.

    Start simple with a bucket-and-shovel castle, or go big with moats, bridges, and multi-towered forts!

    Variation

    For extra excitement, you can add a Sandcastle Challenge—set a timer, build the tallest tower, the most detailed design, or even create themed castles (like pirate forts or mermaid palaces).

    No two sandcastles are ever the same, making each creation a fun, fleeting work of art.


    Materials Needed

    • Sand

    • Water

    • Optional: shells, sticks, seaweed, small pebbles for decoration


    Tools Needed

    • Buckets

    • Shovels

    • Small spades, cups, molds (optional)


    Steps

    1. Pick a Spot: Find a place near the water but not too close to the incoming tide.

    2. Gather Materials: Fill buckets with damp sand (not too dry, not too wet) for better building.

    3. Start Building: Flip filled buckets for towers, mold shapes by hand, or carve details with small tools.

    4. Decorate: Use shells, sticks, and other beach finds to add flair.

    5. Add a Challenge (optional): Set goals—tallest tower, most creative design, or fastest build in 10 minutes!

  • Story chain

    Story Chain is a fun, collaborative storytelling game where each player adds a sentence—or just a few words—at a time. The twist? No one knows exactly where the story will go! It’s a fantastic way to build creativity, listening skills, and quick thinking, plus it leads to some wonderfully silly and surprising stories.

    You can play aloud in a group, write it down as you go, or even make it a long, ongoing story over the course of a day. This activity is easy to adapt for any age and can be done almost anywhere, making it a perfect quick creative challenge.


    Materials Needed

    • None

    (Optional: notebook and pen if you want to write the story down)


    Tools Needed

    • None


    Steps

    1. Start the Story: One person begins with an opening sentence (e.g., “Once upon a time, there was a dragon who hated flying.”).

    2. Take Turns Adding: Each player adds the next part of the story, building on what came before.

    3. Keep It Moving: Encourage quick thinking—no long pauses allowed!

    4. Wrap It Up: After a set number of turns or when the story feels complete, create a funny or dramatic ending.

    5. Optional: Write the story down to illustrate later or act it out!

  • I Spy

    I Spy is a timeless, no-prep game that encourages kids to focus, think critically, and sharpen their observation skills.

    One player picks an object within sight and says, “I spy with my little eye, something that is…” giving a clue such as a colour, shape, or starting letter. The others then guess until someone figures it out!

    It’s endlessly adaptable—you can play it with toddlers using colours, or with older kids using trickier clues like rhyming words or beginning sounds.

    It’s great for building vocabulary, attention to detail, and patience, and it’s perfect for keeping kids entertained anywhere without needing supplies.


    Materials Needed

    • None


    Tools Needed

    • None


    Steps

    1. Choose an Object: Secretly select an object within view.

    2. Give a Clue: Say, “I spy with my little eye something that is…” and describe it by color, letter, or shape.

    3. Start the Guessing: Let others guess based on the clue given.

    4. Reveal the Answer: Once someone guesses correctly, let them pick the next object!

    5. Add Variations (optional): Use harder clues for older kids, such as textures, uses, or riddles.

  • Oobleck: Gooey science you can touch!

    What feels solid when you squeeze it but turns to liquid when you let go? A non-Newtonian fluid! With just water and cornflour, you and your kids can create Oobleck, a gooey, mind-bending substance that’s incredibly fun to play with—and sneakily educational too.

    Kids will love poking, squeezing, and dripping the mixture, learning firsthand about properties of matter and states of change. It’s messy, it’s science, and it’s a perfect hands-on sensory experience!


    Materials Needed

    • Cornflour (also called cornstarch)

    • Water

    • Food coloring (optional for extra fun)


    Tools Needed

    • Mixing bowl

    • Spoon (optional—hands work best!)


    Steps

    1. Mix the Ingredients: Start with about 2 parts cornflour to 1 part water in a bowl.

    2. Adjust Consistency: Stir gently. If it’s too runny, add more cornflour; if too dry, add a little more water.

    3. Get Hands-On: Encourage your child to squeeze it, tap it, and watch how it behaves differently under pressure.

    4. Experiment: Try punching the surface, letting it drip, or rolling it into a ball to see how it acts!

    5. Clean Up: Dispose of the mixture in the bin, not the sink (it can clog drains).

  • Skittle rainbow

    Skittle rainbow

    I found this activity on the wonderful A Suffolk Mum website.

    Skittle Rainbow is a quick, mesmerizing activity that combines creativity with a splash of science. All you need are Skittles, a plate, and some water to create a gorgeous, swirling rainbow right before your eyes. As the water dissolves the colored coating, it spreads out in vibrant patterns across the plate.

    This is a fantastic mini science experiment to teach kids about dissolving, diffusion, and color mixing—plus, it’s absolutely beautiful to watch! Quick to set up, low mess, and endlessly impressive, this activity is perfect for a rainy afternoon or a mini science lesson.


    Materials Needed

    • A pack of Skittles (or any colorful coated candy)

    • A white plate (the flatter the better)

    • Warm water


    Tools Needed

    • None


    Steps

    1. Arrange the Skittles: Place Skittles around the edge of a plate in a circle or fun pattern.

    2. Add Water: Gently pour warm water into the center of the plate until it just touches the Skittles.

    3. Watch the Magic: Within seconds, the colors will begin to dissolve and spread, creating a rainbow effect.

    4. Experiment: Try different patterns, water temperatures, or candy types to see what changes!

  • Sand Art Mandalas

    Sand Art Mandalas

    Sand Art Mandalas are a peaceful and creative way to enjoy the beach and its natural materials.

    Children collect pebbles, shells, seaweed, feathers and driftwood, then use them to create circular mandala-style patterns in the sand. These symmetrical designs not only look beautiful but also encourage focus, patience and appreciation of nature’s textures and colours.

    The process is as important as the result — it’s a lovely mindful activity to do solo or collaboratively. Leave the finished piece as a gentle gift to the beach or take a photo to remember it by.


    Materials

    • Shells, pebbles, stones, feathers, seaweed, driftwood — whatever natural items can be safely collected
    • Stick or finger to mark out design in the sand

    Tools

    • None

    Steps

    1. Start by choosing a clear, flat area of damp sand for your design.
    2. Use a stick or your finger to trace a large circle — this will form the outer boundary of your mandala.
    3. Collect natural materials and organise them into piles for easy access.
    4. Begin building the mandala from the centre outwards, placing items in repeated patterns to form symmetrical rings.
    5. Take a photo if you want to remember it — then let the tide eventually wash it away.

    Variations

    • Collaborative Creation: Work together to build a larger mandala as a group.
    • Theme Mandalas: Choose a colour or texture theme (e.g. all-white shells, or soft materials only).
    • Pattern Practice: Use the opportunity to talk about symmetry, pattern, and repetition.

    Why It’s Great

    • Promotes Mindfulness – A slow, soothing activity that invites focus and calm.
    • Encourages Creativity – Children explore visual design using natural materials.
    • Connects with Nature – Builds appreciation for beach textures, shapes and colours.

    Safety Tips

    • Ensure children avoid sharp shells or anything that could cause cuts or scrapes.
    • Wash hands after handling natural materials, especially before eating.
    • Remind children to respect wildlife — only use items that are loose and not part of living creatures’ homes.
  • Loom Bands

    Loom Bands

    Loom bands are a colourful, creative way for children to make their own wearable art.

    Using small rubber bands and a simple loom or their fingers, kids can twist and loop patterns into bracelets, rings, charms and more. It’s a brilliant activity for building patience, focus and fine motor coordination — and it’s endlessly customisable.

    Whether it’s making friendship bands for mates or keyrings for the family, loom band crafting offers a fun mix of fashion and engineering for creative minds.


    Materials Needed

    • Pack of loom bands (various colours)
    • Loom or loom hook (optional — fingers can work too)
    • S-clips or C-clips for securing the ends

    Tools Needed

    • Loom hook or crochet hook (optional for ease)
    • Small container or tray to hold bands

    Steps

    1. Choose a Pattern
      Start with a basic fishtail or single loop pattern. There are loads of kid-friendly tutorials available online if needed.
    2. Set Up Your Bands
      Organise your colours and decide on a pattern. Encourage your child to think ahead and plan their colour order.
    3. Start Looping
      Use fingers or a loom to weave the bands together, linking one through the next to form a chain. Take it slow — it’s a process!
    4. Finish and Clip
      When the desired length is reached, attach an S-clip or C-clip to secure both ends.

    🧵 Loom Band Tutorials & Patterns

    1. Rainbow Loom YouTube Channel (Official)

    The original brand behind the loom band craze. Their official channel has hundreds of step-by-step tutorials — from beginner to advanced charms, bracelets and animals.

    2. Frugal Fun for Boys and Girls – Loom Band Projects

    A collection of simple loom band crafts suitable for kids. Great for those who want to start with no loom and use just fingers or pencils.

    3. DIY Loom Band Tutorials (Pinterest Board)

    A visual library of bracelet patterns, ring ideas and charm designs. Browse images and click through to blog posts or video instructions.

    4. YouTube: Rainbow Loom Room

    A popular YouTuber known for creative, clear, slow-paced loom band designs — great for younger kids or visual learners.

    6. Instructables – Loom Band Projects

    User-submitted guides ranging from wearable creations to novelty charms. Look out for creative community ideas beyond the basics.


    Variations

    • Charms and Keyrings: Make small shapes or initials that can be attached to bags or zips.
    • Rainbow Patterns: Use bands in colour-order to create bold rainbow effects.
    • Themed Sets: Create seasonal or friendship sets — great as handmade gifts.

    Safety Tips

    • Keep loom bands out of reach of very young children to avoid choking hazards.
    • Supervise younger kids, especially if using a loom hook.
    • Encourage regular breaks — this activity can be fiddly and require lots of focus!
  • Try Martial Arts

    Try Martial Arts

    Martial arts classes are a fantastic way for children to channel their energy, learn new skills, and gain self-confidence.

    From karate and taekwondo to jiu-jitsu and kickboxing, there are beginner-friendly options for all interests and energy levels.

    Classes typically focus on movement, focus and fun — often mixing stretching, drills and games with basic technique. Along the way, children learn respect, discipline and how to safely use their strength. Many enjoy working towards coloured belts or participating in friendly competitions as their confidence grows.


    Why It’s Great

    • Confidence & Discipline – Promotes calm, respectful behaviour and personal pride in progress.
    • Physical Fitness – Builds strength, coordination, balance and flexibility.
    • Focus & Self-Regulation – Encourages patience, listening and emotional control.
    • Fun & Motivation – Kids love working towards goals like earning their next belt or mastering a move.

    How to Get Started

    • Search for local clubs offering kids’ martial arts classes — many start from age 4 or 5.
    • Look for a style that suits your child — karate, taekwondo, judo, Brazilian jiu-jitsu, etc.
    • Begin with a free or low-cost taster session to see if they enjoy it.
    • Most clubs require a basic uniform (“gi”) after a few sessions — some offer loan kits to start.

    Variations

    • Mini Ninjas or Little Dragons: Some clubs offer playful pre-school martial arts with a focus on balance, coordination and fun.
    • Non-competitive Classes: Ideal for children who prefer learning without pressure to spar or compete.
    • Family Sessions: Some clubs offer parent–child or sibling sessions to enjoy together.

    Safety Tips

    • Ensure the class is run by a qualified, DBS-checked instructor with first aid training.
    • Children should warm up and stretch before physical activity to avoid injury.
    • Check the focus is on control and discipline, not aggression — especially in early classes.
  • Pirate Adventure

    Ahoy, matey! A pirate adventure is the perfect make-believe activity for curious explorers and bold little buccaneers. Using everyday items like cardboard boxes, towels, and toy binoculars, kids can build their own pirate ship and set sail on thrilling missions to uncover hidden treasure.

    This kind of role-play supports creativity, storytelling, problem-solving, and even early map-reading as children imagine routes across the seas and search for X-marks-the-spot. Best of all, it’s endlessly adaptable—indoors or out, solo or with a crew!


    Materials Needed

    • Cardboard box or laundry basket (as a ship)
    • Towel, sheet, or pillowcase (as a sail)
    • Cardboard tube or toy telescope
    • Treasure (e.g. gold coins, beads, small toys)
    • Optional: pirate hat, eye patch, cuddly parrot

    Tools Needed

    • Crayons, markers, or card (for making signs or treasure maps)
    • Scissors and tape (for costume or ship crafting)

    Steps

    1. Build the Pirate Ship
      Use a cardboard box or similar container as the boat. Attach a “sail” using a towel or pillowcase.
    2. Dress the Part
      Make or find pirate hats, eye patches, and even a toy parrot for the shoulder.
    3. Make a Treasure Map
      Draw a simple map with landmarks (real or imaginary) and an X to mark the treasure.
    4. Set Sail and Search
      Sail around the house or garden, avoiding sea monsters, spotting islands, and looking for hidden treasure.
    5. Celebrate the Find
      Once the treasure is found, hold a pirate party or share out the loot!

    Variations

    • Treasure Hunt: Hide coins or tokens and follow map clues to find them.
    • Pirate Training: Set up obstacle courses, rope swings, or balance beams as part of a training academy.
    • Pirate Talk Challenge: Stay in character and speak like a pirate—“Arrr!”—for the whole adventure.
    • Message in a Bottle: Write or draw secret notes and post them in bottles for others to discover.
  • Space Mission

    Space Mission

    Space Mission play lets kids dream big—really big! Using everyday objects like cushions, boxes, and kitchen foil, children can build their own spacecraft, invent alien worlds, and take on the role of brave astronauts exploring the galaxy.

    This kind of pretend play encourages curiosity, storytelling, problem-solving, and an early interest in space and science. Whether they’re searching for alien life, collecting moon rocks, or fixing the ship’s controls, there’s no limit to what they might discover.


    Materials Needed

    • Cushions, pillows, or chairs (for spacecraft controls)
    • Cardboard boxes or colanders (for helmets)
    • Blankets (for shuttle bays or rocket covers)
    • Optional: foil, glow-in-the-dark stickers, toy tools

    Tools Needed

    • Crayons, scissors, or tape (for decorating helmets or making mission control panels)

    Steps

    1. Build Your Spaceship
      Use cushions, boxes, or furniture to make a control deck. Add buttons or dials drawn on paper or made from bottle tops.
    2. Make Helmets
      Decorate a cardboard box or wear a bowl or colander as a pretend space helmet.
    3. Assign a Mission
      Decide what the astronauts need to do—explore a new planet, rescue a stranded alien, or fix a broken satellite.
    4. Blast Off
      Countdown from 10 and launch into your mission! Make sound effects, bounce on “zero gravity” cushions, or role-play walking on the moon.
    5. Return to Earth
      Land safely and debrief—what did you find? What went wrong or right on the mission?

    Variations

    • Alien Encounter: One person can play a friendly alien with a mystery to solve.
    • Moon Rock Hunt: Hide foil-wrapped “moon rocks” around the room and collect samples.
    • DIY Control Panels: Create cardboard dashboards with labels, buttons, and sliders.
    • Science Tie-In: Pair the play with a book or video about space or the solar system.
  • Story Cubes

    Story Cubes

    Story Cubes (or story prompts) are a wonderful way to encourage creativity, build language skills, and develop storytelling confidence.

    Whether you’re using special story dice, homemade picture cards, or simply words written on scraps of paper, the goal is the same — to inspire your child to invent and tell their own story, one prompt at a time.

    This activity works beautifully as a quiet afternoon game, a screen-free bedtime routine, or a creative way to build confidence in speaking and storytelling. It’s also a lovely shared activity for parents and carers to take part in too.


    Materials Needed

    • Story cubes or dice (shop-bought or homemade)
    • Alternatively: small cards or paper slips with words or pictures
    • Optional: notebook for writing stories down

    Tools Needed

    • None

    Steps

    1. Prepare the Prompts
      Use story cubes or make your own (see below) using drawings or written words (e.g. dragon, mountain, storm, treasure).
    2. Roll or Draw
      Roll the cubes or pick several cards to create a set of random prompts.
    3. Start the Story
      Use the first prompt as the opening idea for your story. Build the story step-by-step using each new prompt.
    4. Keep Building
      Take turns adding to the story or let your child take the lead. There’s no right or wrong!
    5. Finish and Share
      Once the story is complete, read it aloud, act it out, or write it down if your child enjoys writing.

    Variations

    • Make Your Own Cubes: Use blank dice or print templates to draw your own pictures.
    • Group Storytelling: In a group, each person adds one sentence or idea to continue the story.
    • Timed Stories: Set a timer and see how many stories you can create in 10 minutes.
    • Illustrate the Story: After telling the story, draw a picture together to bring it to life.

    Story Cube Prompt Ideas

    Here are some ideas you can use to create your own story cubes or prompt cards. Feel free to mix and match depending on your child’s age and interests:

    Characters

    • Dragon
    • Wizard
    • Superhero
    • Princess or Prince
    • Alien
    • Detective
    • Talking animal
    • Giant
    • Robot
    • Monster

    Objects

    • Treasure chest
    • Magic wand
    • Lost key
    • Spaceship
    • Map
    • Secret door
    • Time machine
    • Golden coin
    • Invisibility cloak
    • Strange potion

    Settings

    • Castle
    • Jungle
    • Haunted house
    • Desert island
    • Underwater city
    • Outer space
    • Mountain cave
    • Ancient temple
    • Fairy garden
    • Secret laboratory

    Events or Problems

    • A storm begins
    • Something gets lost
    • Someone is trapped
    • Time runs out
    • They find a clue
    • A riddle must be solved
    • A race starts
    • A mysterious letter arrives
    • The power goes out
    • A new friend appears
  • Sock Puppet Show

    Sock Puppet Show

    A Sock Puppet Show brings storytelling and performance together in a fun and creative way.

    Kids can make their own puppets from old socks, adding eyes, hair, or fabric scraps to create expressive characters. Once their puppets are ready, it’s time to put on a show!

    This is a great rainy-day activity that lets children explore voices, dialogue, and stage presence — all from behind a couch or cardboard theatre.


    Materials

    • Old socks
    • Glue or a needle and thread (with adult help)
    • Buttons, googly eyes, scraps of felt or fabric, yarn for hair
    • Cardboard box (optional, to create a puppet theatre)

    Tools

    • Glue (fabric or PVA)
    • Scissors
    • Needle and thread (optional)

    Steps

    1. Gather old, clean socks and lay out decorations like buttons, yarn, and fabric scraps.
    2. Help children glue or sew on eyes, hair, or clothes to turn the sock into a character.
    3. Let the glue dry before play if needed.
    4. Use a couch or cut a hole in a cardboard box to act as the puppet stage.
    5. Encourage children to make up stories or funny voices and put on a short performance.

    Variations

    • Story Challenge: Give each puppet a character and work together to create a story beginning, middle and end.
    • Interview Time: Pretend the puppets are on a talk show and ask them silly questions.
    • Theme It: Base the puppets around animals, superheroes, or storybook characters.

    Why It’s Great

    • Boosts Imaginative Play – Kids get to create both the characters and the show.
    • Encourages Public Speaking – Performing behind a puppet gives children confidence.
    • Reduces Waste – A brilliant use for old socks and scraps of craft material.
  • Rose Perfume

    Rose Perfume

    Making rose perfume is a lovely, hands-on sensory activity that uses real petals to create a gentle floral scent. It’s simple enough for younger children and provides a creative connection to the natural world — especially if you can gather the petals together in a garden or park.

    Children can explore textures, smells, and colours while learning about plants and making something they can proudly bottle up. The end result is more of a floral water than a true perfume, but the process is what makes it magical.


    Materials

    • Fresh rose petals (a few handfuls — the more fragrant, the better)
    • Warm water (not boiling)
    • A jar or bowl
    • A sieve or muslin cloth
    • A clean small bottle or container (optional, for storage)

    Tools

    • Spoon for stirring
    • Jug (optional, for pouring)

    Steps

    1. Gather rose petals — either from the garden or a bunch of fading roses (ask permission first!).
    2. Place the petals in a jar or bowl and gently pour over warm water until they’re just covered.
    3. Let the mixture sit for at least 20–30 minutes to infuse.
    4. Stir occasionally and enjoy the scent developing.
    5. Strain the liquid through a sieve or cloth into a bottle.
    6. Use the floral water to lightly scent paper, add to play, or simply enjoy the fragrance.

    Variations

    • Use Other Flowers: Lavender, jasmine, or honeysuckle also work well if available.
    • Add Citrus Peels: A tiny bit of lemon or orange peel adds a fresh twist.
    • Decorate the Bottle: Use stickers, ribbons or labels to personalise the perfume container.

    Why It’s Great

    • Sensory Exploration – A gentle way to engage smell, sight and touch.
    • Creative Expression – Children can design, mix and decorate their own “product”.
    • Nature Appreciation – Encourages close observation and appreciation of plants.

    Safety Tips

    • Always supervise closely, especially with younger children handling petals and warm water.
    • Do not ingest the perfume or apply it to skin — it’s for fun and smell only.
    • Only use flowers that are known to be safe and unsprayed — avoid florist or roadside plants unless you’re sure.
  • Tag

    Tag is a classic game that never gets old. With no setup and no special equipment needed, it’s an instant go-to for outdoor fun. One player is “it” and tries to tag the others—once someone’s tagged, they become “it,” and the chase continues!

    There are countless variations too—like freeze tag, shadow tag, or tunnel tag—that keep things fresh and fun. Whether in the backyard, park, or schoolyard, tag gets kids moving, thinking fast, and working on coordination and social play. Plus, it’s fantastic exercise disguised as a game.


    Materials Needed

    • None


    Tools Needed

    • None


    Steps

    1. Choose a Play Area: Pick a safe, open space with plenty of room to run.

    2. Select Who’s “It”: Choose one child to start as the tagger.

    3. Start the Chase: The tagger tries to touch another player, who then becomes the new tagger.

    4. Add Variations (Optional): Try freeze tag (players freeze when tagged) or shadow tag (tag by stepping on someone’s shadow).

    5. Keep It Moving: Play as long as the energy lasts!


    Variations

    Check out this list of fun variations on the classic tag game

  • Bounce on a Trampoline

    There’s nothing quite like the feeling of bouncing on a trampoline. It’s exciting, physically engaging, and packed with benefits for kids’ development. Trampolining helps improve balance, coordination, spatial awareness, and muscle strength—all while delivering big-time fun.

    Kids can jump freely, play “bounce and freeze” games, or create their own silly trampoline routines. For added challenges, try games like “crack the egg,” “bum bounce,” or “copycat jumps.” Whether solo or with siblings (one at a time for safety!), it’s a fantastic way to enjoy the outdoors and get moving.


    Materials Needed

    • Trampoline (with safety net if possible)


    Tools Needed

    • None


    Steps

    1. Set Ground Rules: Make sure kids understand safe jumping—one at a time, no flips unless trained, and stay away from the edge.

    2. Warm Up: A few light bounces to start.

    3. Free Bounce or Play a Game: Try challenges like “freeze mid-jump,” “bounce and catch,” or “count to 100.”

    4. Cool Down: End with gentle bouncing or stretching to wind down.

  • Bat & ball

    Sometimes the simplest games are the most satisfying. A bat and ball can turn any outdoor space into a playground for skill-building, exercise, and laughter. Whether you’re practicing gentle hits with younger kids or setting up a full mini game of rounders or cricket, bat & ball play encourages hand-eye coordination, balance, and movement.

    You can keep it casual—just taking turns hitting and chasing the ball—or create fun challenges like how many times they can hit the ball without dropping it. It’s a perfect go-to activity for the garden, park, or beach.


    Materials Needed

    • Lightweight bat (plastic, foam, or wooden depending on age)

    • Ball (tennis ball, foam ball, or soft rubber ball)


    Tools Needed

    • None


    Steps

    1. Pick a Play Area: Find a safe, open space free of windows or fragile items.

    2. Demonstrate the Basics: Show your child how to hold the bat and gently swing.

    3. Take Turns: One person hits while the other throws or pitches the ball.

    4. Make It a Game: Count consecutive hits, run between points, or play a casual match.

    5. Adjust for Age: Use softer equipment and underhand throws for younger kids.

  • Play a Board Game

    Board games are a fantastic way to bring the whole family together. Whether it’s a fast-paced matching game or a thoughtful strategy challenge, they help kids practice important skills like taking turns, problem-solving, counting, and teamwork—all while having fun.

    You can choose a game that fits your child’s age and mood, from memory games to trivia, dice-based races, or storytelling games. Many require minimal setup and are perfect for indoor play. If you’re feeling extra creative, you could even design your own board game as a bonus activity!


    Materials Needed

    • A board game suited to your child’s age (e.g. Snakes & Ladders, Guess Who, Uno, Connect 4, etc.)


    Tools Needed

    • None (just the game itself)


    Steps

    1. Pick a Game: Choose one that matches the number of players and energy level (some are calm, others get competitive!).

    2. Set Up the Game: Lay out the board, pieces, and instructions.

    3. Go Over the Rules: Read the rules aloud, or have kids help explain if they already know them.

    4. Start Playing: Take turns, keep score if needed, and encourage fair play.

    5. Celebrate the Fun: Win or lose, focus on laughter, learning, and spending time together.

  • Make a secret den

    There’s something magical about having a secret hideout all your own. With just a few household items, kids can create their very own den—a cozy space to curl up with a book, play quietly, or let their imaginations run wild. Drape blankets over chairs, add pillows and soft lighting, and voilà! You’ve got a private fort that feels like a whole new world.

    Whether it becomes a spy headquarters, fairy castle, reading nook, or nap zone, making a secret den is a wonderful way to spark creativity and give kids a comforting space of their own. It’s also great for quiet time after more energetic play.


    Materials Needed

    • Blankets or large sheets

    • Pillows or sofa cushions

    • Fairy lights or battery-powered torches

    • Stuffed animals or favorite toys

    • Books or drawing supplies for inside the den


    Tools Needed

    • Chairs or furniture to anchor the den

    • Clothespins, clips, or rubber bands (optional, to secure blankets)


    Steps

    1. Pick a Location: Choose a safe space with enough room—under a table, between chairs, or against the couch.

    2. Build the Frame: Use chairs, furniture, or even a drying rack as the den’s structure.

    3. Drape Blankets: Hang blankets or sheets over the frame to create walls and a roof.

    4. Make It Cozy: Line the floor with cushions, pillows, or sleeping bags.

    5. Add Details: Place books, toys, fairy lights, or decorations inside to make it feel special.

    6. Keep It a Secret (optional!): Add a “no grown-ups allowed” sign or password for fun.